In the age of social media, the allure of heavily edited, picture-perfect snapshots is undeniable. However, a significant shift towards authenticity is emerging, with more photographers and audiences alike craving a more natural, unedited aesthetic. Adobe Lightroom, a powerhouse in the photo editing world, is an invaluable tool for achieving such realism in your photographs. This blog post will guide you through essential tips and techniques to use Lightroom to enhance your photos while maintaining a vibrant yet natural look. I hope you will find this tutorial helpful, whether you are a seasoned photographer or a beginner or enthusiast looking to improve your editing skills to achieve better more natural results.


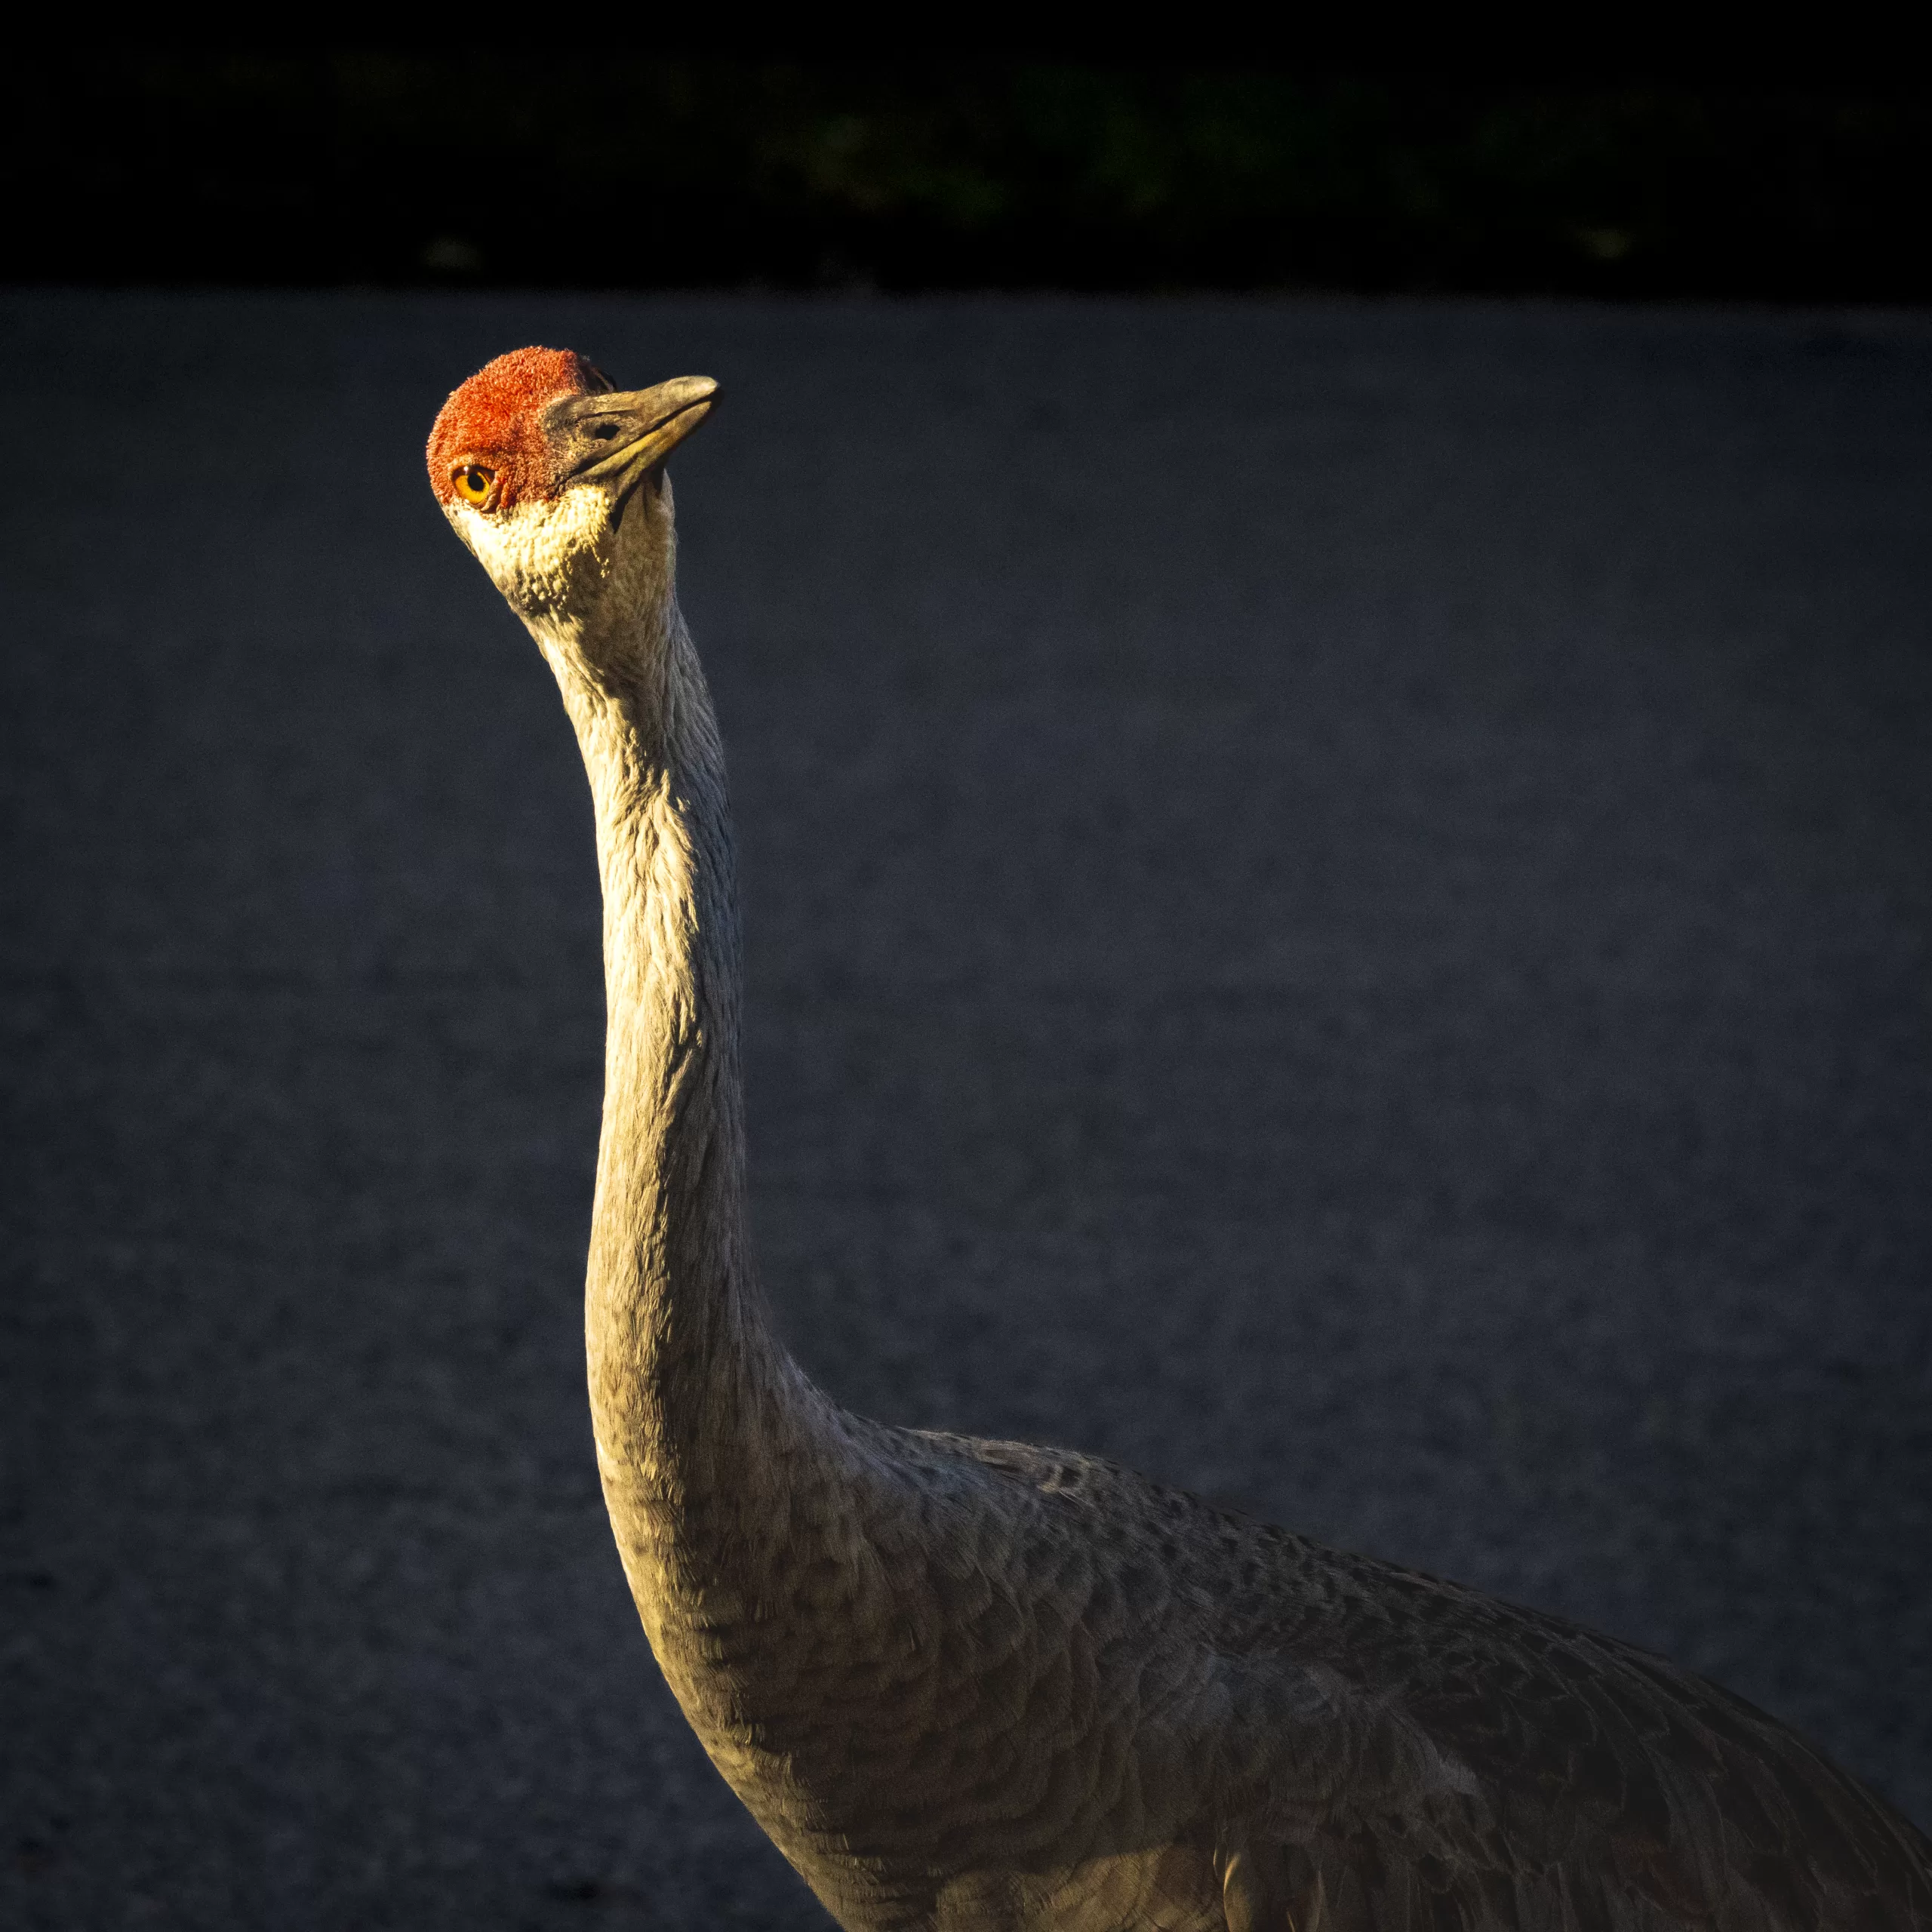
Top is the unedited image off camera. The bottom is the result after editing in Lightroom. Note the attention to the preservation of natural details while managing to enhance the subject in a natural way. We want to bring out the full purity, color and detail of the Sandhill Cranes’ feathers, eye and contours while keeping the back ground a little darker and creamier. Enhancing the natural elements of the image, for instance the warm lighting without resorting to excessive noise reduction or artificial enhancements or over editing.
Mastering Lightroom Basics for Natural Edits
Before diving into natural photo editing techniques, let’s master some Lightroom basics. Understanding a few key tools will help you achieve that realistic, unedited look.
- RAW Files: Start by shooting in RAW. This file format captures all image data recorded by the sensor when you take a photo. Unlike JPEG, it allows you greater flexibility and control in post-processing. Do keep in mind that Raw files will take up more space on your memory card or smartphone. Canon does offer the compresses RAW format which is offers a smaller file while preserving all the fine detail and metadata. On smartphone you can choose RAW on iPhone or Pro Mode on Samsung to shoot photos in this format.
- Subtle Exposure Adjustments for a Natural Look: Lightroom’s Basic panel is your starting point for making adjustments. Subtle changes to exposure and contrast can dramatically affect the mood and detail of your image.
- Color Correction: Finding the Perfect White Balance: Managing white balance and color correction is pivotal. Lightroom provides tools to adjust the temperature and tint to reflect the true colors of your scene.

Minimalistic Editing Approach
The essence of a natural look is not over-manipulating your photo. Here are key minimalistic approaches to keep your edits understated:
Finding the Right Balance: Exposure for Natural Edits
Exposure is one of the most fundamental adjustments in Lightroom, significantly impacting the overall mood and detail of your photo. When aiming for a natural aesthetic, the key is to find the right balance, avoiding drastic alterations that might create an unrealistic feel. Here’s how to use Lightroom’s exposure tools effectively for natural photo editing:
- Understanding the Exposure Slider: The “Exposure” slider in the Basic panel directly controls the overall brightness of your image. A natural edit typically avoids extreme adjustments. Move the slider subtly in small increments to achieve a balanced look.
- Highlight Recovery and Shadow Recovery: Underexposed photos often have clipped blacks (areas with no detail) and blown-out highlights (areas with no color information). Lightroom’s “Highlights” and “Shadows” sliders allow you to recover detail in these areas without creating an artificial look. Use them judiciously to bring back some detail without going overboard. Aim for natural-looking shadows and highlights that retain some texture and color information.
- The Power of Curves: The Tone Curve panel offers a powerful way to fine-tune exposure in a natural way. For a natural aesthetic, consider an S-curve adjustment. This gently increases contrast in the midtones while protecting the highlights and shadows. It mimics the dynamic range of human vision, enhancing the natural feel of your photo without appearing overdone.
Remember:
- Less is More: When aiming for a natural look, it’s often better to under-edit rather than over-edit. Make small, incremental adjustments and zoom in to assess the details in your highlights and shadows.
- Calibrate Your Monitor: Ensure your monitor is accurately calibrated to represent colors and tones correctly. This helps you make more precise exposure adjustments that achieve a natural look on the final output.
- Consider Local Adjustments: If specific areas of your photo require exposure tweaks, explore using the Adjustment Brush, Graduated Filter, or Radial Filter. This allows you to selectively target areas that might be underexposed or overexposed without affecting the entire image, maintaining a more natural overall look.
Natural Light, Natural Look: Mastering the Tone Curve in Lightroom
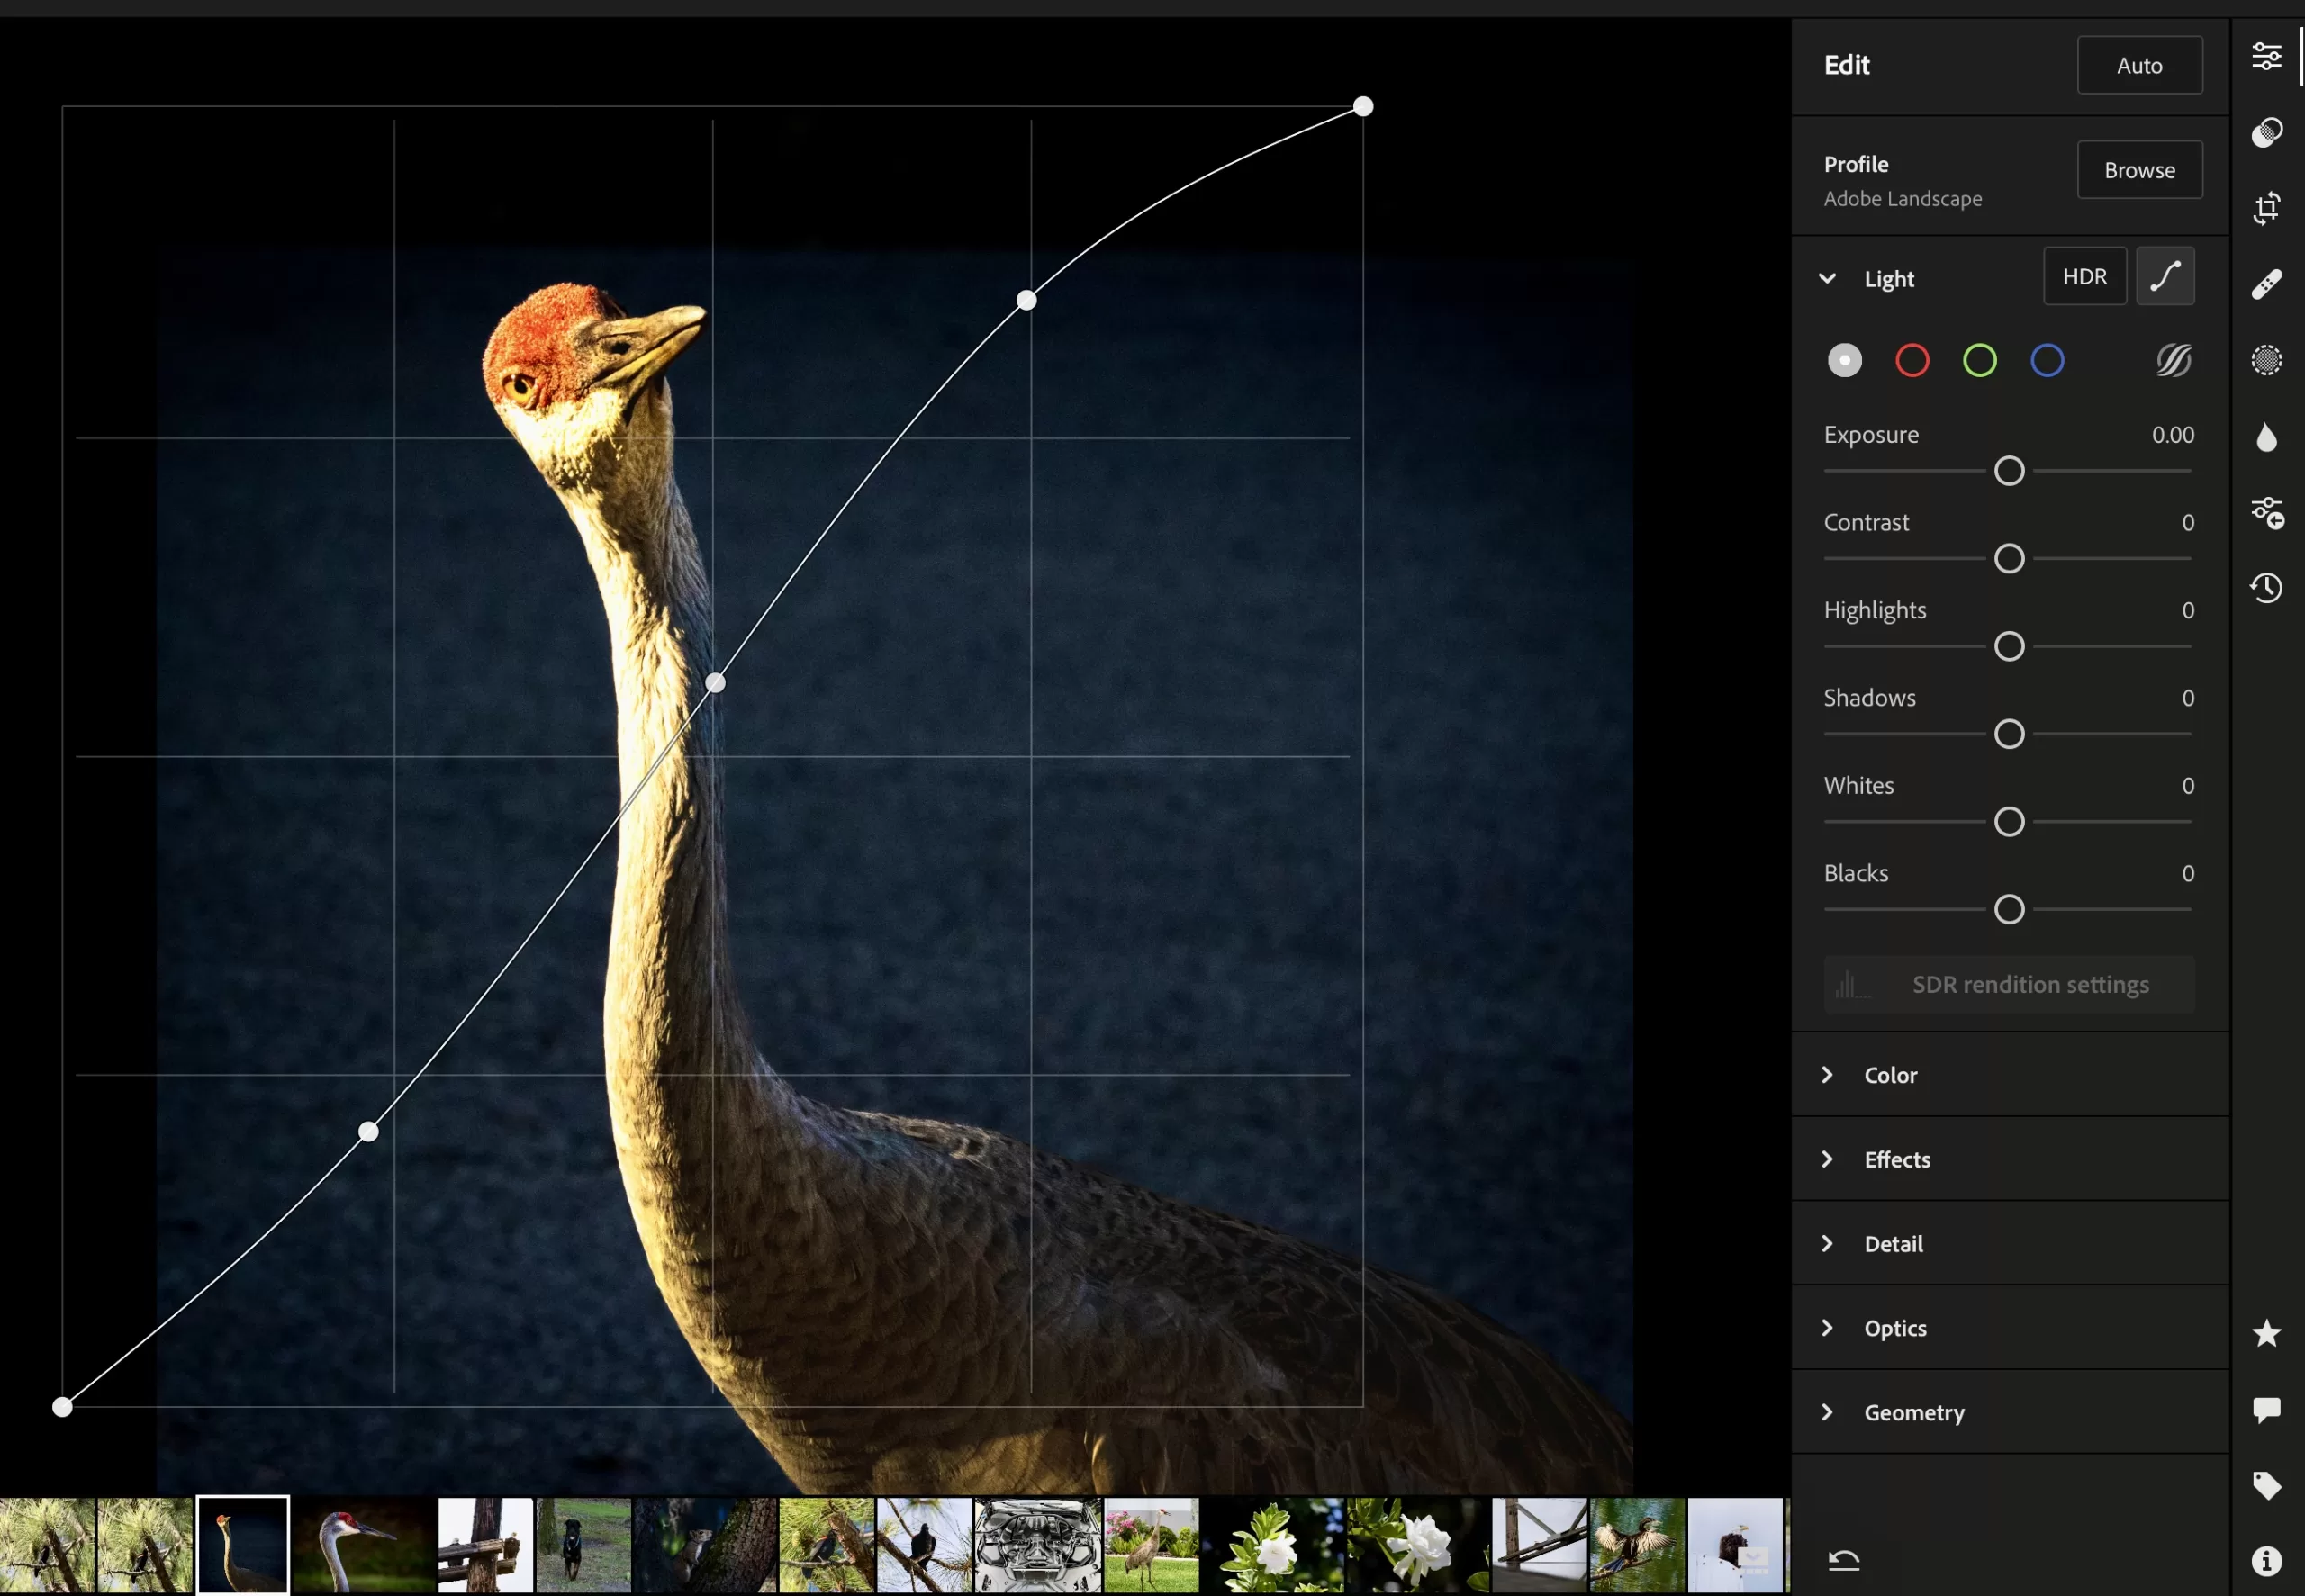
The Tone Curve is a powerful tool within Lightroom’s Develop module, offering precise control over the tonal range (highlights, shadows, midtones) of your image. When striving for a natural aesthetic in your photo edits, the Tone Curve becomes even more valuable. Here’s how to leverage it effectively:
- Understanding the Curve: Visualize the Tone Curve as a graph with the X-axis representing the original image tones (dark on the left, light on the right) and the Y-axis representing the adjusted tones. A straight diagonal line indicates no adjustments.
- The S-Curve for Natural Contrast: For a natural look, avoid drastic adjustments. Instead, aim for a gentle S-curve. To achieve this:
- Click on a point near the bottom left of the curve. This represents the shadows. Drag it upwards slightly to lift the shadows and recover detail without creating an unnatural, crushed look.
- Click on a point towards the top right of the curve, representing the highlights. Drag it downwards slightly to recover some detail in the highlights while maintaining natural-looking brightness. The goal is to create a smooth S-shape that subtly enhances contrast while preserving natural-looking shadows and highlights.
- Targeted Adjustments with Point Curve: Lightroom offers two options: Point Curve and Parametric Curve. While Parametric offers broader adjustments, Point Curve allows for more precise control. This is particularly helpful if you want to target specific tonal areas for a more natural edit.
- Local Tone Curve Adjustments: For even more granular control, explore the “Local Adjustments” panel. Tools like the Adjustment Brush, Graduated Filter, and Radial Filter allow you to apply separate Tone Curve adjustments to specific areas of your image. This is beneficial for situations where, for example, you might want to brighten a foreground element without affecting the natural look of the background sky.
Natural Editing Tips:
- Start Subtle: Begin with minor adjustments to the Tone Curve. It’s always easier to add more contrast or recover details later if needed.
- Reference the Histogram: The Histogram is a valuable tool that visually represents the tonal distribution of your image. Use it as a guide while adjusting the Tone Curve. Aim for a smooth curve that doesn’t hug the edges of the histogram, indicating a balanced tonal range that retains natural highlights and shadows.
- Calibrated Monitor Advantage: A calibrated monitor ensures accurate color and tone representation. This allows you to make more confident adjustments using the Tone Curve to achieve a natural look on your final exported image.
By following these steps and maintaining a focus on natural aesthetics, you can utilize the Tone Curve in Lightroom to elevate your photos, enhancing their inherent beauty without appearing overdone. Remember, small, well-considered adjustments are key to achieving a realistic and natural look.
Vibrance Over Saturation
To keep colors realistic yet vivid, prefer the ‘Vibrance’ slider over ‘Saturation.’ Vibrance selectively increases the intensity of the more muted colors and leaves the already well-saturated colors alone, reducing the risk of color clipping.
Sharpening and Noise Reduction
Lightroom’s ‘Detail’ panel allows you to sharpen your image and reduce noise. Apply sharpening to enhance texture and detail subtly. Meanwhile, noise reduction can help smooth out the grain in your image, but overdoing it can lead to a loss of detail. Therefore, balance is key.
Lens Corrections
Enable profile corrections to automatically correct lens distortions such as vignetting and chromatic aberration. This helps in achieving a cleaner look, which is closer to what the human eye sees naturally.
Advanced Color Grading
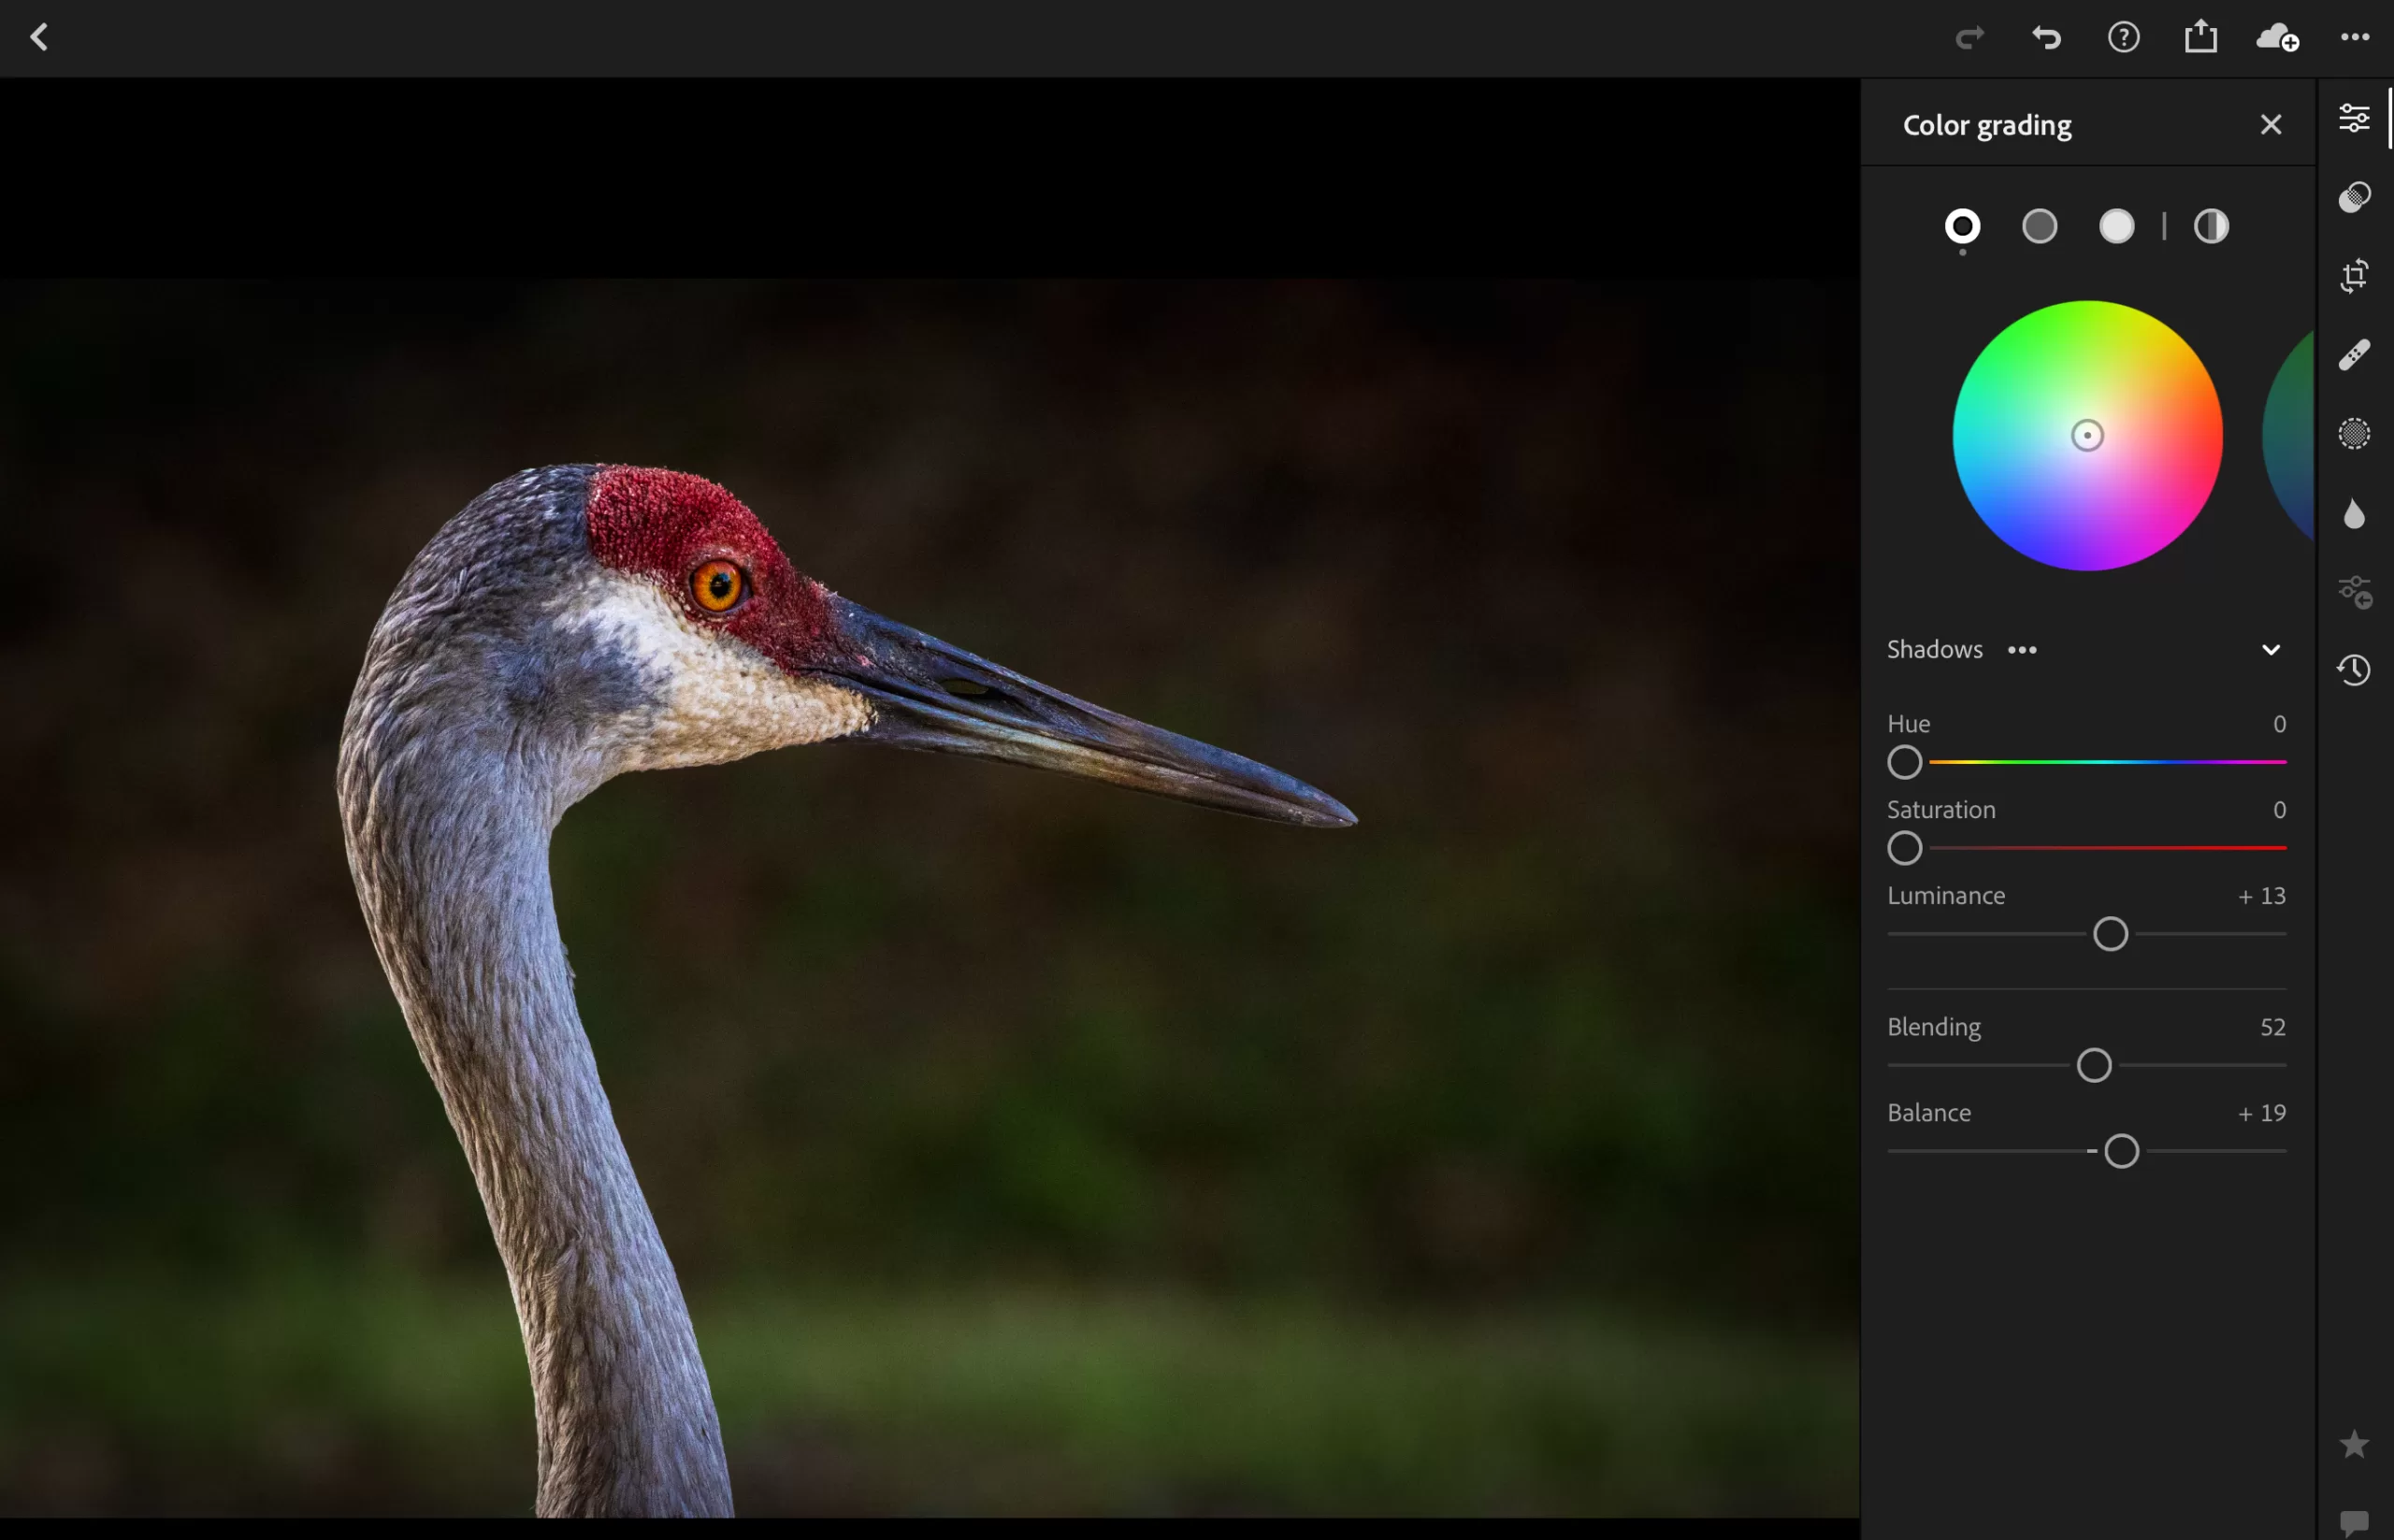
For a more advanced touch, delve into the ‘Color Grading’ panel. This tool replaces the older ‘Split Toning’ and offers control over the colors in the shadows, midtones, and highlights. Use this to enhance or subtly shift mood lighting in your photos.
Utilizing Presets Judiciously
While presets can be a quick way to apply a certain look or style, relying heavily on them can steer you away from a natural look. If you choose to use presets, consider tweaking them to suit the specific needs of each photo. You can also work to create your own presets which could be saved and used as a baseline on photos taken in the same scene or similar lighting.
Local Adjustments
Tools like the adjustment brush, graduated filter, or radial filter in Lightroom are perfect for making local adjustments. Use these to brighten faces, enhance eyes, or draw attention to specific parts of your image without affecting the entire photo.
Selective Attention: Using Masks for Natural Subject Enhancement
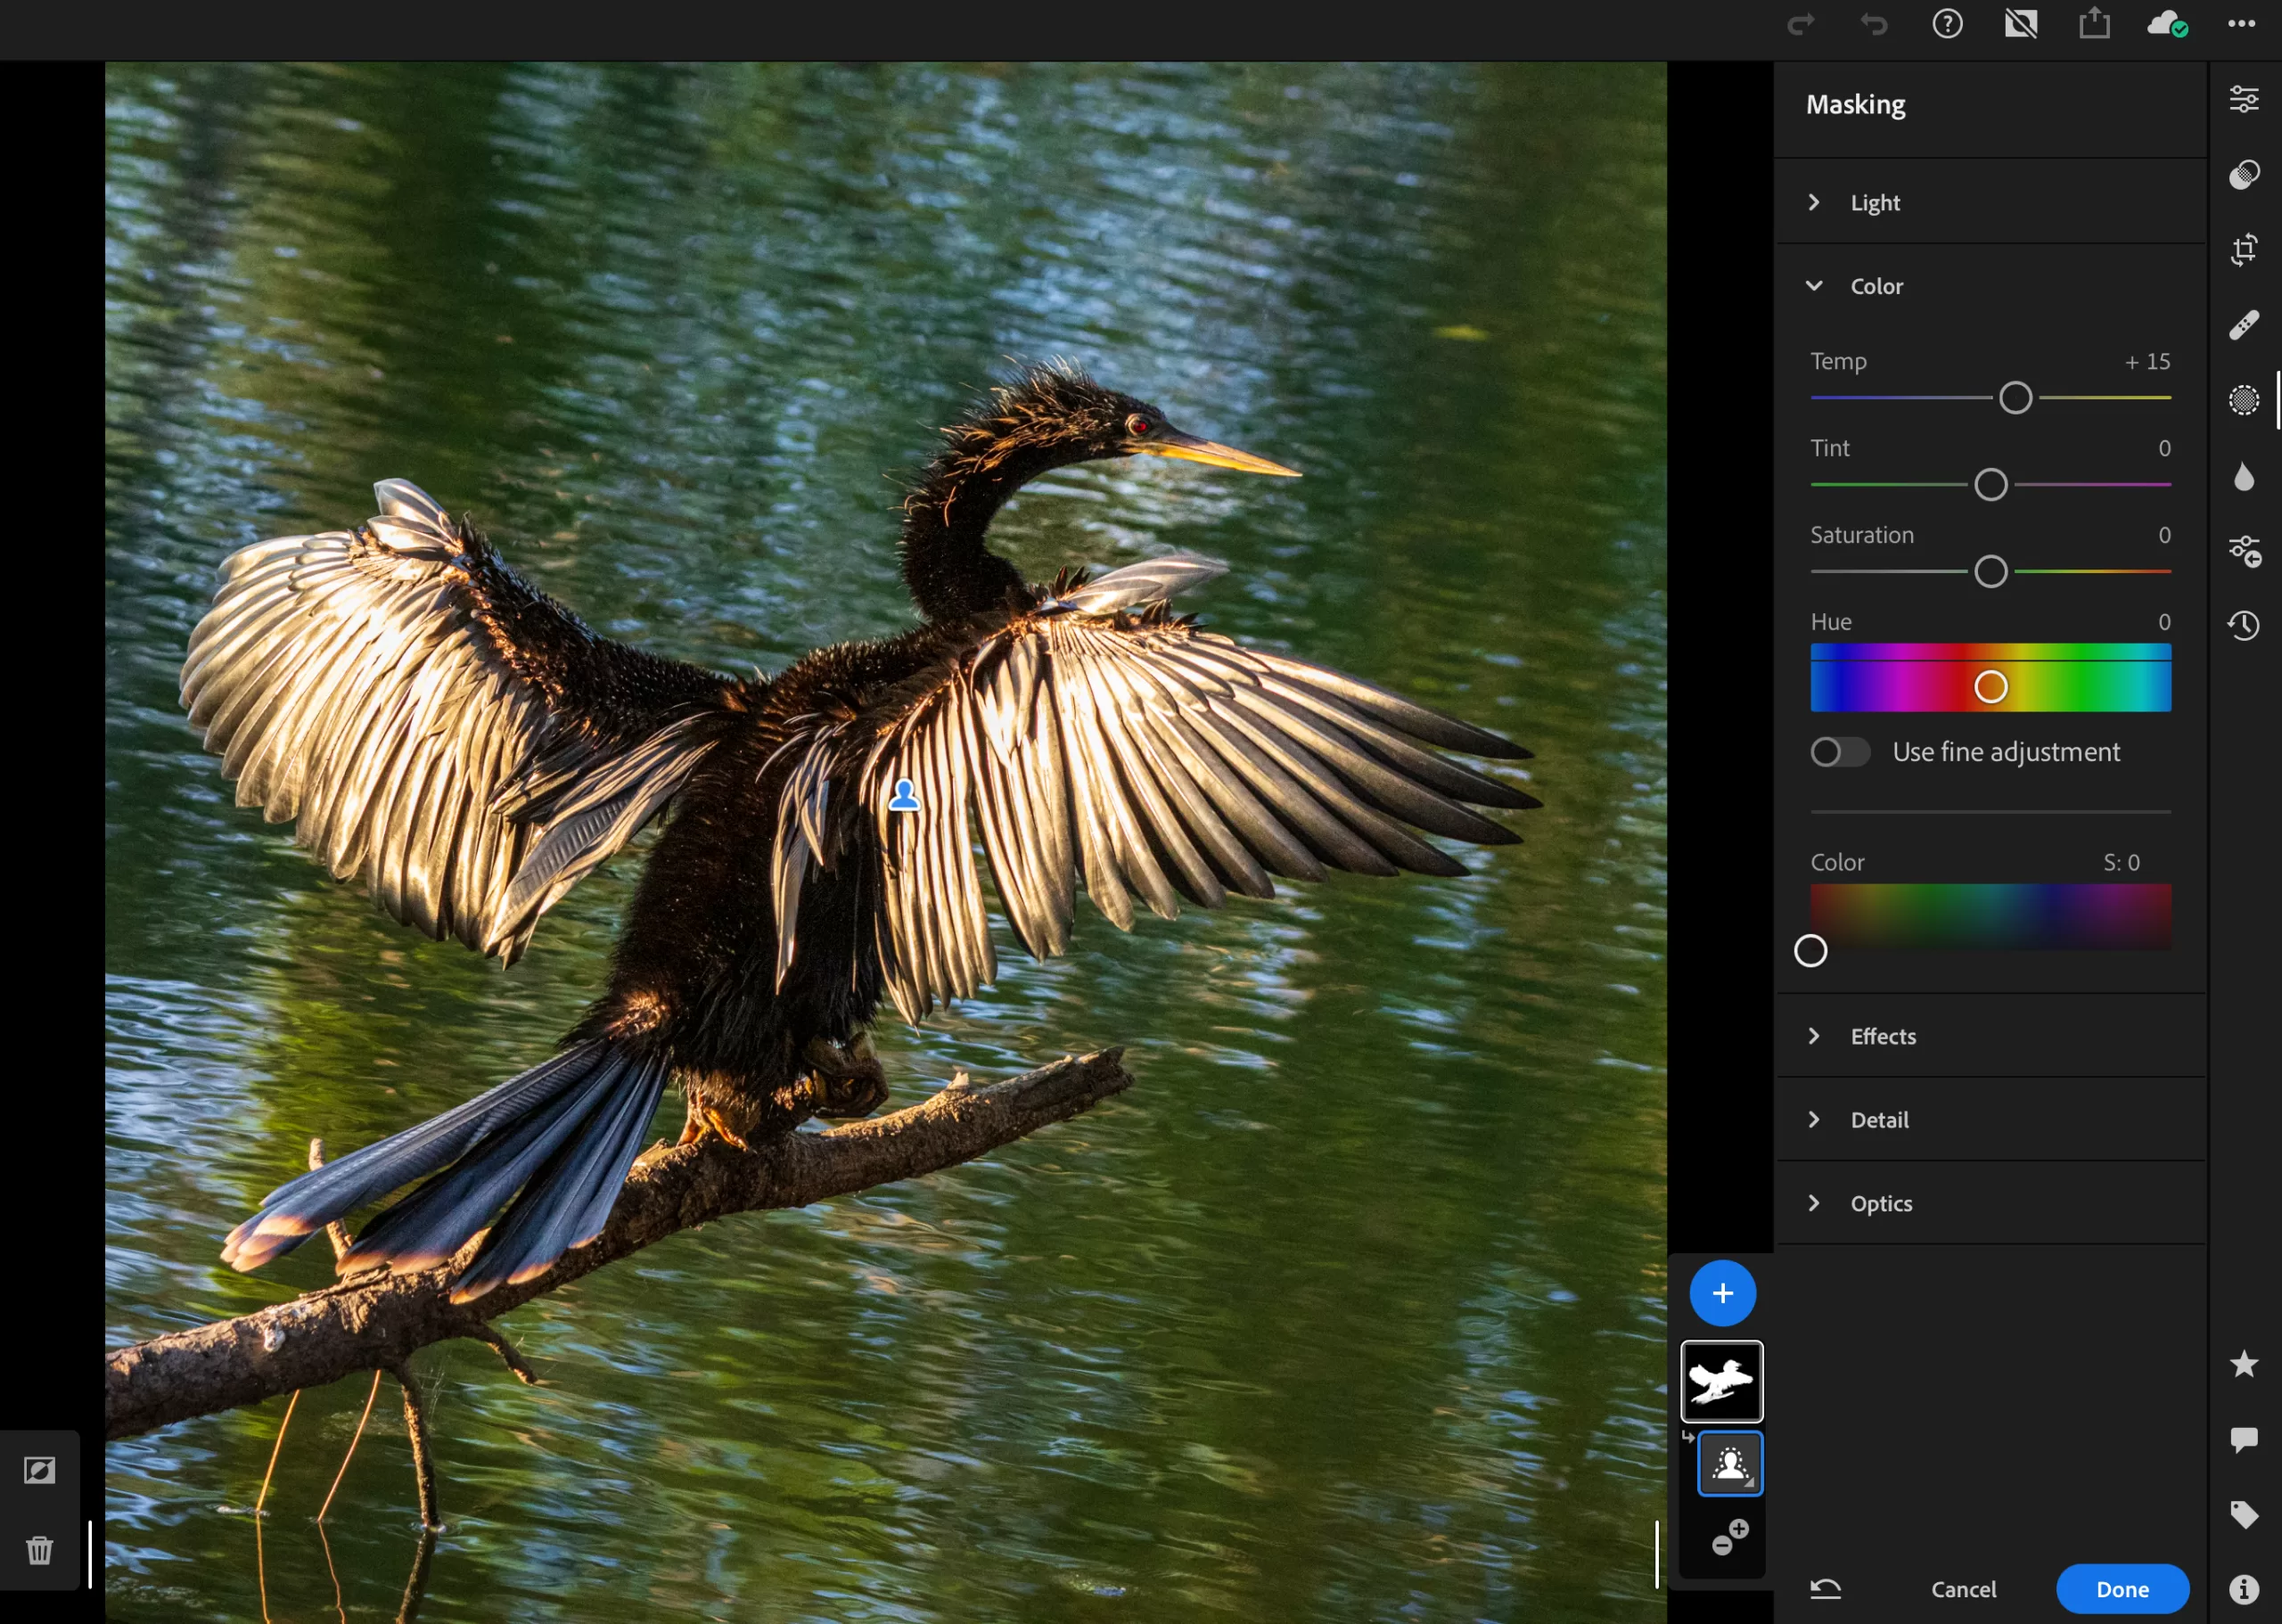
Masking in Lightroom is a powerful technique that allows you to selectively edit specific areas of your image. This is incredibly useful when you want to draw attention to your subject and enhance its presence while maintaining a natural overall aesthetic. Here’s how to achieve this:
- Choosing Your Tool: Lightroom offers a variety of masking tools:
- Brush Tool: Ideal for precise adjustments on well-defined subjects like people or animals.
- Graduated Filter: Suited for gradual adjustments, useful for highlighting subjects against backgrounds like sunsets or landscapes.
- Radial Filter: Excellent for emphasizing central subjects or creating a vignette effect while maintaining a natural look around the edges.
- Creating a Mask: With your chosen tool, paint over the area you want to affect (your subject). Lightroom will invert the mask, so anything outside the painted area will be editable. Adjust the mask’s feather for a smooth transition from the edited area to the unedited area, ensuring a natural look.
- Natural Edits with Targeted Adjustments: Once your mask is created, use the adjustment sliders to selectively enhance your subject. Here are some natural edit ideas:
- Increase Clarity or Texture: Subtly raise the “Clarity” or “Texture” sliders to add a touch of detail and definition to your subject, making it stand out naturally.
- Targeted Exposure Adjustments: If your subject is slightly underexposed compared to the background, use the mask to brighten it selectively without affecting the overall exposure of the photo, maintaining a natural light feel.
- Balancing Color and Tone: Similarly, use the mask to selectively adjust color temperature, tint, or vibrance of your subject. Aim for subtle enhancements that make the subject pop without appearing unrealistic or oversaturated.
Natural Masking Techniques:
- Less is More: When masking for a natural look, avoid drastic edits within the masked area. Focus on subtle enhancements that gently draw attention to your subject.
- Refine the Mask: Use the “Refine” brush to perfect your mask’s edges for a smooth and natural transition between edited and unedited areas.
- Masking for Dodge and Burn: Lightroom’s “Dodge” and “Burn” tools allow for localized exposure adjustments. Combine masking with these tools to subtly brighten specific areas within your subject (like eyes or highlights on hair) for a natural, three-dimensional look.
Remember:
- Natural Light Inspiration: Draw inspiration from natural light itself. Observe how light falls on your subject and try to mimic that effect with your masking adjustments.
- Calibrated Monitor Advantage: A calibrated monitor ensures you’re viewing colors and tones accurately. This helps you make more precise masking adjustments that achieve a natural final result.
By mastering masking techniques and prioritizing natural aesthetics, you can effectively use Lightroom to make your subject pop without compromising the overall realism of your photo. Let the natural beauty of your subject shine through with targeted edits and a focus on maintaining a balanced and natural look.
Final Thoughts: Keeping It Real
The goal of using Lightroom should not be to drastically alter your photos but to enhance their natural beauty. By understanding the light and elements within your scene and using Lightroom tools judiciously, you can achieve stunning results that look both professional and beautifully real.

Conclusion
By embracing these Lightroom techniques, you can ensure your photos convey the beauty of the scene as it was, with minimal digital interference. This approach not only respects the authenticity of the moment captured but also appeals to the growing audience that values realism in photography. Remember, the best photo edits are those that aren’t noticed at all—they enhance subtly, maintaining the integrity and the story of the photograph.
